
Heyy guys and gals!
This post has attracted a lot of attention to my beauty blog since I posted it and since I have decided to separate my content, I thought it would be a good idea to start driving all that traffic to my new blog. In the future I will be doing more DIYs here, so I want everything to be in one place for your convenience. It is also fitting to be reposting this as my son’s birthday is coming up! So exciting!!
NOTE: This is a repost from my other blog, and was originally posted on December 7th, 2018. Nothing was edited. Everything is the same, except updated Pinterest image! 🙂 Enjoy!
*
*
*
December 7th, 2018:
Today I have a MEGA post because it’s literally a bunch of DIYs. Tomorrow is CL’s birthday AND his party, so I’m excited to show you all what I’ve been working on for the past 3 months.
I didn’t really know what to call these; crafts? Projects? Birthday decor? I don’t know. Some of these crafts/projects are very very simple, just a matter of measuring or drawing, while others are more extensive and require painting and paper mache.
I didn’t get as creative for his birthday last year, so this year I literally kicked it up a notch and made a lot of things myself, with some help from Alex. I wanted to post all these crafts BEFORE I post about his birthday, because I want to link back to this post when I finally show you how I set up everything.
***This post is for those of you who need ideas or inspo, as well as those of you who may come from Pinterest. I made sure to have everything in ONE place for your convenience.***
Anyway, you guys don’t have to read the entire post, UNLESS you need the directions to make the crafts. You can scroll through to see the photos. I will post about CL’s birthday next Wednesday if I can get all the photos ready and edited, otherwise you’ll have to wait until the 19th. BUT, at least you guys get to see a true sneak peek of what I will be working with tomorrow.
Many of these ideas were taken from Pinterest, and a few I just made up as I went lol. Making these crafts was super fun and it was very exciting watching our hard work come together once the piece was finished. Mostly my hardwork, but I’m giving Alex some credit because he DID help lol. Ok, let’s start with the first thing I made.
P.S. I’m sorry for the crappy photos, it was late and I didn’t always have natural light.
P.P.S. Most of the stuff I used to create these projects I bought from the dollar store, so don’t go out and buy something expensive if you can find it there!
* * *
#1: Foam Letters
I knew I wanted letters in the Super Mario font for CL’s name, to make it more personalized and special I guess? So I got a few different foam pieces from the dollar store and put this together:

What you need:
- round floral foams (preferably circled if you can find them, I used 4)
- floral foam blocks, whatever size you like (I used two but get more if you need them)
- letters in desired font and already cut out (I made sure to measure the font size before printing)
- pencil or pen
- x-acto knife
- acrylic paints (I used black, red, blue, and green)
- 1 sheet white cardstock
- sharpies or markers
- Elmer’s glue
- toothpicks
STEPS:

- Place your letters on top of the circle foam to trace them.
- When you have outlined your letters onto the foam, carefully, use the x-acto knife to cut them out.
- Make paper mache paste (1 part flour, 1 part water).
- Using small strips of newspaper, dip them into the mixture, and start covering your foam letters, be sure to lay the newspaper as flat as you can onto your letters. Let dry for at least 24 hours.
- Repeat Step 4 with the foam blocks with bigger pieces of newspaper. Let dry for at least 24 hours.
- Paint your letters in different colors (front and back) and let dry. Be sure to paint your blocks as well.
- OPTIONAL: You can stop there and leave your letters a solid color, but my husband decided the letters would look better if they “represented” a character. Using the letters from Step 1, trace the letters on white cardstock and sketch aspects of the characters inside the letters. [Alex wanted credit: he sketched the letters]
- Using colored sharpies or markers, color in your letters and cut them out. (We chose to match the main color from each sketched letter to the foam letter, which is why they were painted a certain color.)
- Using Elmer’s glue, glue the letters on top of the already painted foam letters.
- Using toothpicks, pierce the bottom of the letters (on the middle) and place them on top of the foam blocks however you like, and DONE!

#2: Giant Number
This was another idea from Pinterest, and I thought it would be cool to make a huge number.

What you need:
- 2 posters, color doesn’t matter because you will be covering it
- pencil
- scissors
- paper mache paste
- large newspaper strips
- *empty* toilet paper rolls, cut in half
- hot glue gun
- masking tape, I used 2 inch tape
- acrylic paint or something better that’s more opaque (your choice of color)
STEPS:
- Sketch the number on one of your posters and cut it out. Trace the number onto the second poster and cut it out.
- Place the *empty* toiler paper rolls on top of one of your numbers to figure out where you will be gluing them. I decided to cut them in half because I didn’t want the number to be too wide.
- Use your hot glue gun to glue the paper rolls into place. I didn’t have enough so I only placed them through the middle. I do recommend using more to get as close to the edge as possible, for more stability.
- Glue your second number on top of the paper rolls.
- Using a 2 inch masking tape, carefully wrap the sides.
- Dip newspaper strips into the paper mache paste and lay them flat onto the number. Let dry for at least 24 hours before painting.
- Paint the number in the chosen color, front, back and sides. Wait to dry. (I chose blue and I painted it in sections. I also painted several coats to get the opacity I wanted.)

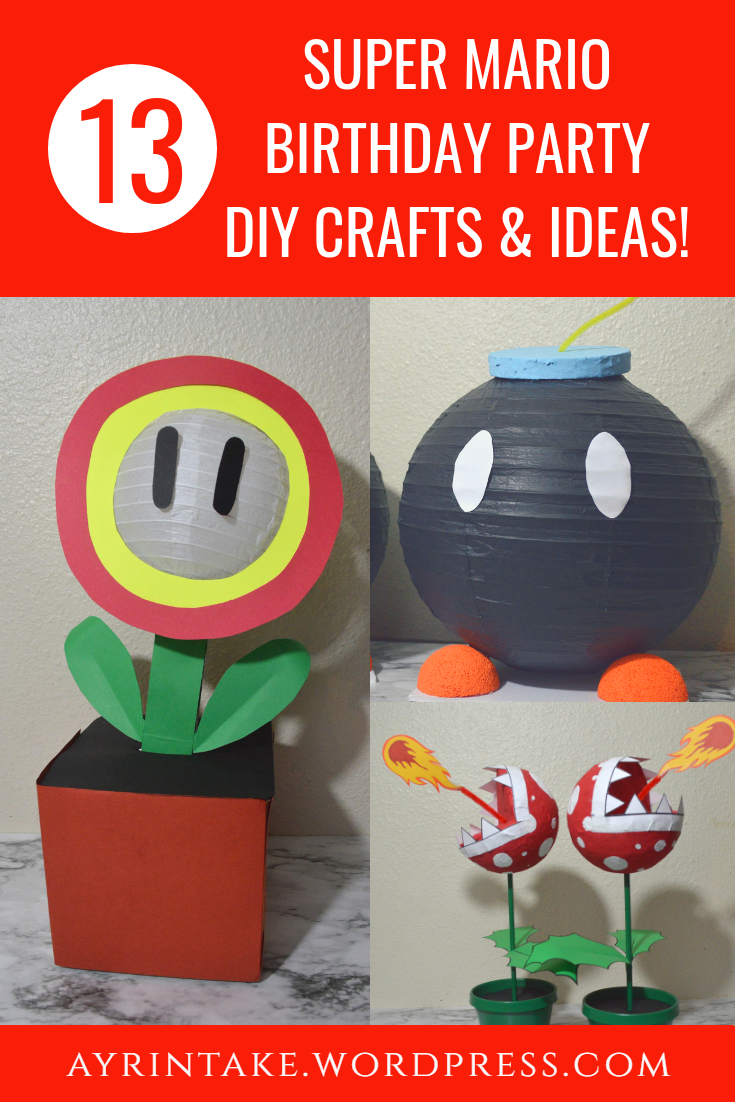
#3: Piranha Plants
These were challenging but I’m glad that they turned out just fine.

What you need:
- 2 styrofoam spheres (I forgot the size, sorry! Probably 5 inches in diameter)
- 2 plastic pots (got these from Ace Hardware)
- green glossy Krylon spray paint
- small/skinny dowel (also forgot the size of this, sorry! bought it from Michael’s)
- floral foam, their shape fit inside the plastic pots
- pencil or pen to sketch
- x-acto knife
- paper mache paste
- newspaper
- red and white acrylic paint
- 1 sheet white cardstock
- 1 sheet green cardstock paper
- 1 sheet black cardstock paper
STEPS:

- Clean your plastic pots with Windex to prep for paint. The paint I used didn’t need primer, but it’s important that the surface is cleaned for an even finish.
- Spray paint your pots green, these will act as the pipes.
- Cut your dowel to the size you need and spray paint them green. (I cut them into thirds initially, but cut it down much more when it came time to put the entire thing together).
- Using your pencil or pen, sketch the mouth of the piranha on your foam spheres, measuring from the middle, out. This will depend on what shape you want the piranha to take.
- Use your x-acto knife to cut out the foam sphere. Your spheres should resemble Pac-Man, lol. Try to cut it out as neatly and evenly as possible.
- Dip newspaper strips into the paper mache paste and cover your spheres. Try to get an even/flat surface as best as you can, round surfaces are harder to cover. Let dry for at least 24 hours.
- Once dry, paint the spheres red. Let dry for as long as they need and paint it again if it needs extra coats.
- Using the white acrylic paint, paint circles of different sizes across the DRY surface of the sphere. This will give it the piranha look.
- Sketch out the teeth on your white cardstock paper. We chose to outline them with black sharpie so they could stand out more.
- Place the floral foam inside the plastic pot. Pierce the green dowel through the bottom, middle of the sphere (piranha plant), and pierce the floral foam. Cut the dowel more if you need to.
- Sketch out a circle in your black cardstock and cut out a whole the size of the dowel. This will cover the floral foam underneath.
- Sketch out the leaves in your green cardstock paper and using either tape or glue, stick them to the dowel.
- OPTIONAL: Sketch out “fire balls” on yellow and orange cardstock to add more uniqueness to your pieces. To make it appear as though it’s coming out of the piranha’s mouth, use a red pipe cleaner. [This was Alex’s idea.]

#4: Question Boxes — Centerpieces
I believe I saw this originally done with squared yellow plates, but I could NOT find them anywhere, so I decided to get a yellow poster board to sketch out the box, and fold it all together. I made two sizes, mainly because the big one was the first one I made, and it wasn’t well done, lol.
I also reinforced it with a foam poster board because the poster paper wasn’t strong enough. This was only complicated because of all the measuring between the poster board and the foam poster board.

What you need:
- yard stick or small ruler (to measure)
- 2 yellow poster boards (I used two to make two boxes)
- 2 foam poster boards
- pencil to sketch
- x-acto knife
- Elmer’s glue or hot glue gun
- 2 bags of yellow decorative shred
- 2 balloon weights (had them from last year)
- 2 sheets of regular white paper
- scissors
- OPTIONAL: wings [another of Alex’s idea]
- scrap piece of white paper
- 2 – 3 sheets of white felt
- pencil to sketch
- sharpie to outline
- scissors
- poly-fil (I had some laying around from a previous project)
- sewing kit
STEPS:

- Start by measuring and sketching out your boxes on the yellow poster board. Your boxes only need 5 faces. My first box was 7Lx7Wx7H inches but it seemed too big so the second one was 6Lx6Wx6H inches. — Don’t forget to add an extra inch for flaps! This will come in handy to cover the foam pieces you will be putting inside..
- Measure out your foam board to fit FIVE (5) pieces INSIDE the box (bottom, and four sides). This will reinforce it and prevent the box from folding. This step was really tedious and annoying.
- Using a hot glue gun, glue your foam pieces inside the box to cover the bottom and the sides. Fold and glue your flaps on the inside.
- Sketch out the question mark on a regular white sheet of paper. Make sure to take into account the measurements of the box to put the question mark right in the middle.
- Use Elmer’s stick glue to glue the question marks onto all four sides (if you don’t want to add the wings). If you will be adding the wings, only glue question marks to two opposite sides of your box. Note: I forgot to add the circles on the corners, but make sure to cut out some circles from the same sheet of paper.
* *
If you’re doing all four sides with question marks, you’re all DONE!
Otherwise, keep reading for the steps for the wings.
OPTIONAL: WINGS
[Credit goes to Alex for coming up with this idea.]

- In a piece of paper, sketch out the shape of your wing, outline with sharpie and cut it out.
- Place your paper wing on top of a felt piece, and outline the wing with sharpie. Be sure to flip the paper over to outline the other side of the wing. Note: you don’t have to use sharpie or have a hard outline, we wanted it to stand out a bit.
- Cut out the felt wing pieces, and pair them off.
- Sew your felt wings together, leaving a small gap unsewn. I did a very basic sewing pattern. I also used both white and black thread because I ran out of white.
- Add small pieces of poly-fil through the unsewn gap of your wings. Keep adding poly-fil until you’re satisfied with the stuffing.
- Finish sewing the wings together, and DONE!

#5: Flower Power
[Credit goes to Alex for this idea]
I didn’t actually get to take photos of the process because Alex did it while I was busy with something else. By the time I was done he had already put it all together.

What you need:
- an empty cubed cardboard box ( the smaller the better)
- several sheets of reddish-brown cardstock
- several sheets of green cardstock
- 1 sheet yellow cardstock (I ran out so I had to use a neon one)
- 1 sheet red cardstock
- 1 sheet black cardstock
- scrap black cardstock
- scrap foam poster board
- Elmer’s glue stick
- 1 small white paper lantern (I think one was 6 inches in diameter)
- invisible tape
STEPS:
- Start by measuring and gluing the red/brown cardstock sheets to your box on all the sides, the bottom doesn’t have to covered.
- Measure out a big circle in a red cardstock sheet, this one will be the biggest one. Cut out the center of the circle. Make sure it’s big and thick enough to go around the paper lantern.
- Measure out a smaller circle in your yellow cardstock and cut out the center as well. Make sure it’s big and thick enough to go around the paper lantern, but smaller than the red one as it will overlap it.
- Tape or glue the yellow circle on top of the red one. Then tape the circles over the paper lantern.
- Using a scrap piece of foam, cut it lengthwise. This will act as the flower stem. Doesn’t have to be long.
- Cover your foam stem with green cardstock. Alex used a stapler but feel free to use a hot glue gun. TIP: Wrap the green cardstock on the wire frame and then glue or staple it to the foam steam, so it stays intact.
- Sketch out the leaves in a separate green cardstock sheet. Cut out and glue onto the foam stem.
- Cut a horizontal sliver on the top flaps of your cardboard box, the width of your foam stem, and tape the box shut.
- Measure and glue a black square on the top of your box. Make sure to cut out the sliver on the black cardstock as well.
- Insert the foam stem through the sliver you cut in step 8. To secure it better, use a hot glue gun to keep the foam stem/flower in place.
- In a scrap black cardstock, sketch the eyes and cut them out. Use a hot glue gun to add a dot to the middle of the eyes, and stick them onto the paper lantern.
- DONE!

#6: King Boo & Boos
This was another idea taken from Pinterest. Very very simple.
[Credit to Alex for drawing the faces of the boo’s.]

What you need:
- varying sizes of white paper lanterns
- pencil to sketch
- black and red sharpies
- fishing line (to hang them)
- OPTIONAL: yellow cardstock for King Boo’s crown and stapler
STEPS:
- Set up your paper lanterns.
- CAREFULLY, sketch the faces of each Boo, and go over the pencil lines in sharpie.
- With fishing line of various lengths, secure a knot on the wire frame and hang on the ceiling. This will give them that “floating” effect.
- OPTIONAL: CROWN
- Sketch out the shape of the crown and make sure it’s as big and round as the top of the paper lantern.
- Cut out the crown and staple the ends together.
- Use scrap paper to staple “flaps” to opposite ends of the crown. Make sure you staple the flaps on the bottom of the crown. (I’m sorry I didn’t take a photo of this! And I’m sorry if it’s confusing!)
- Insert the flaps through the top, they will keep the crown from falling off. And you won’t have to glue the crown to the paper lantern.

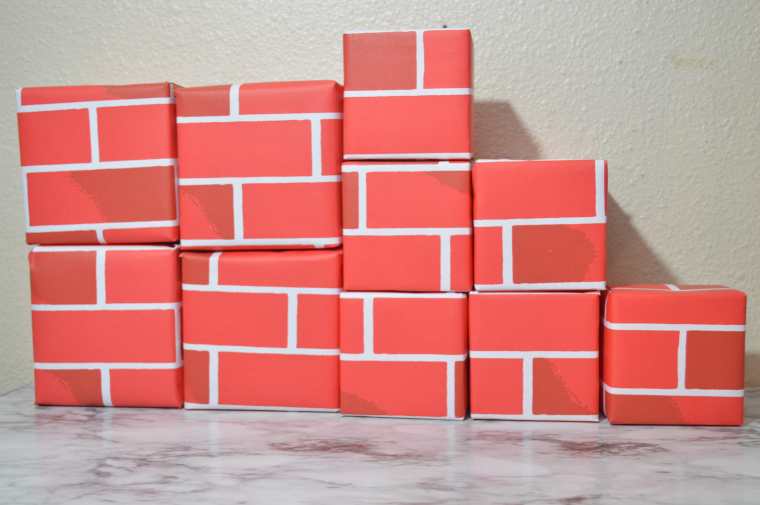
#7: Bricks
Another tedious project that requires a lot of measuring.
What you need:
- red brick wrapping paper (got it from Michael’s)
- cubed floral foams (found these at the dollar store) OR small cubed cardboard boxes (I used both for varying sizes)
- pencil
- yard stick or ruler
- scissors
- invisible tape
STEPS:
- Measure your boxes and draw the “faces” of your box on the wrapping paper. You only need five. Add an extra inch for flaps.
- THIS STEP IS VERY IMPORTANT: to avoid wrapping the boxes in a weird way where the lines won’t match across the faces of the box, (remember it’s a brick and the pattern stays the same horizontally), tape the horizontal faces first. Proceed to tape the flaps of those horizontal “faces” onto the box or foam cube.
- You should have the vertical faces UNTAPPED. Lay the wrapping paper flat on a table, and FOLD the extra flaps inward to sort of “hide” them. This will prevent you from taping them on the outside, which will ruin the pattern of the side faces.
- Fold the vertical faces over the box and DONE!

NOTE: I know I didn’t take pictures of the important steps, but your box should follow the pattern horizontally, and it should NOT change direction if you look at it overhead.
#8: Bob-Ombs
Another idea from Pinterest. This one is very simple to put together, the only hard thing about it is the blue cap and the feet/shoes.

What you need:
- 2 black paper lanterns
- 2 circle foams (same ones used for the styrofoam letters, turns out they were the perfect size)
- 2 sphere foams (whatever size you think will work for the shoes, will also depend on how big the paper lanterns are)
- paper mache paste
- newspaper strips
- baby blue and orange acrylic paint
- x-acto knife
- 1 or 2 yellow pipe cleaners (they’re actually white but I wanted them to stand out and went with yellow ones instead)
- hot glue gun
- half of 1 foam poster board
- scrap white cardstock
STEPS:
- Start by dipping your newspaper strips into the paper mache paste and cover your circle foam entirely. Make sure to lay them as flat as possible. Let dry for at least 24 hours.
- Once the circle foam is dry, it’s ready to paint. Paint it with baby blue acrylic paint. Add more coats as needed. Let dry.
- Cut your foam spheres in half, and paint them orange. Let dry. NOTE: you also have the option to use paper mache for this step. I personally chose against it because I thought the texture would be nice, BUT it’s a bit harder to paint foam this way. You need many many coats of paint.
- Grab the wire frame from your paper lantern and place it perpendicular onto one side of the circle foam. Mark the ends of the wire frame.
- Using your x-acto knife, cut a sliver/line into your circle foam, following where the wire frame will sit. Make it a bit deep so the wire frame can stay “stuck”.
- Insert the wire frame onto the sliver you cut, if it’s deep enough, the wire frame won’t move easily.
- Using your x-acto knife, cut a small hole through the middle of your circle foam. Using half of a pipe cleaner, gently push it through all the way and secure with hot glue or simple fold the pipe cleaner. This will be the fuse.
- CAREFULLY, proceed to insert the wire frame with the circle foam inside the paper lantern to build it.
- Using your hot glue gun, add a few dots to the front edges of your circle foam and press gently to the paper lantern. The circle foam will be slightly slanted forward, but it’s not that noticeable, and it also adds an extra hold so neither the “cap” comes off, and if the wire frame comes undone, the glue will keep the cap in place.
- Use hot glue to glue the orange shoes onto the paper lantern.
- On scrap white cardstock, sketch out the eyes and cut them out. Put a drop of hot glue onto the eyes and glue them on carefully onto the paper lantern.
- OPTIONAL: For more stability, we cut out rectangles of foam poster board that act as a base. We hot glued the paper lantern wire frame onto the foam poster board and we also made sure to hot glue the shoes onto the foam base. In this way, you can move the Bob-Omb anywhere without needing to be held up by something else.

#9: Chain Chomp
Another simple one. Also taken from Pinterest.

What you need:
- 1 black paper lantern
- scrap of white cardstock paper
- 1 sheet white cardstock
- several sheets of black cardstock
- scissors
- stapler
- hot glue gun
STEPS:

- Start by cutting black cardstock sheets, lengthwise. I think I made the chains 2 inches wide? I also used only seven strips.
- Staple the ends of one strip, and intertwine another through the first. Repeat with the remaining strips.
- On scrap white cardstock, draw circles and cut out the center. These will be the eyes. No need to “fill in” the center with black marker or sharpie, as gluing them straight onto the lantern will do the job.
- One white cardstock sheet, sketch out the mouth, outline with sharpie and cut out.
- Place the eyes and mouth onto the paper lantern to figure out placement. Don’t glue anything until you’re absolutely sure. I made the mistake of gluing the mouth first and it ended up being too low, so I ruined one paper lantern.
- When you’ve figured out your placement, carefully hot glue the eyes and mouth.
- Figure out the placement of the chain, and hot glue it to the paper lantern.
- DONE!

ISN’T HE A CUTIE?!!
#10: Clouds

What you need:
- 2 white poster boards
- pencil to sketch
- black sharpie
- scissors
- OPTIONAL: fishing line
STEPS:
- Sketch the shape of your clouds on your poster boards. DO NOT OUTLINE.
- Sketch the eyes and fill them in with black sharpie.
- Cut out your clouds.
- OPTIONAL: I will be hanging my clouds to make it appear as though they’re suspended. So I’m using fishing wire to hang them since it’s kind of transparent.
#11: Snack Bar Place Cards
I designed the place cards myself and had them printed out on regular paper. I made triangular “stands” out of cardstock and glued the place cards onto the cardstock. Very very simple.

12: Snack Bar “Power Up” Banner
This I also made myself. It could be made from squared paper or plastic plates, but again, couldn’t find them anywhere. It was far cheaper for me to buy a pack of white paper plates from the dollar store, paint them yellow (because I have paint), glue traced or printed letters onto the plates and done!

I am using fishing line to hold them together as I will be hanging it over the snack bar.
#13: Goodie Bag Inspo
The goodie bag inspo actually came from what my cousin did last year for CL’s Cars themed birthday party. She printed out the face and glued them onto the bags.
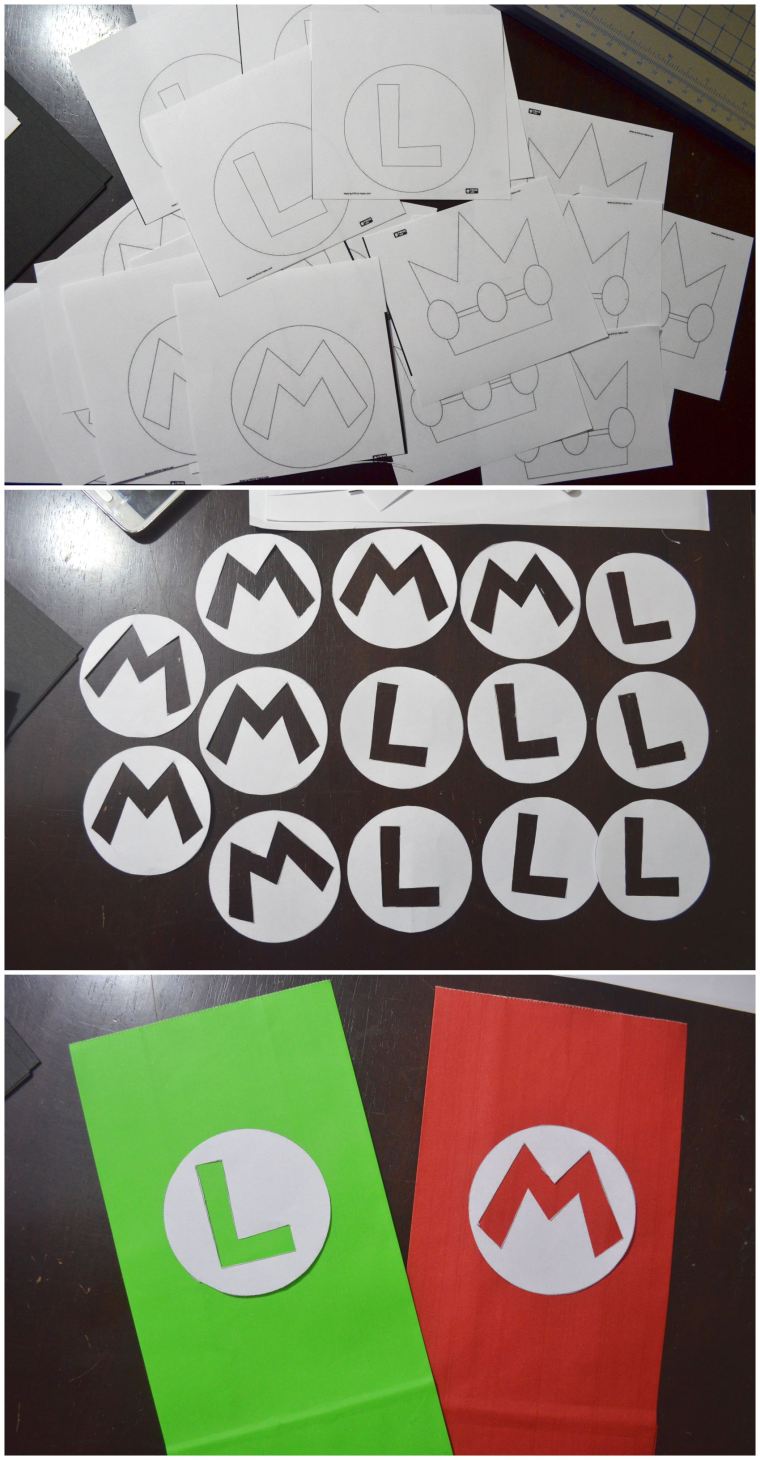
This year, I printed out the M and the L in Mario’s & Luigi’s hats, cut the letter out, and glued them onto the bags. This was a bit tedious but it saved me from coloring the letters. The Princess Peach bags I actually had to color but they were very easy to make.

I added Super Mario themed party favors, chocolates, rice krispie treats and some Mexican candy. I hope the kids like these bags LOL.
I know this is a very long post! And again, you don’t have to read it all, I sure hope no one did unless they needed directions! LOL. This is just MY WAY of making certain projects for my son’s party. I’m not trying to show off or anything, I just truly want to make it a great and memorable party for my son and I get more enjoyment out of making something rather than buying it anyway. And once I had the idea in my head to do this, it was extremely hard to talk myself out of it lol.

I feel like I might top last year’s birthday party, which means, I will either have to top this one next year (which will prove difficult), or make it a much simpler birthday. The good thing about these crafts is that we get to keep them as decorations because CL LOVES Super Mario anyway. 🙂
I know it was a lot of crafts, but which is your favorite?
Do you like to get crafty or would you rather buy stuff?
Find me on social media:

Oh my gosh, these ideas are so cute and creative! I am blown away by how much effort you all put into these, and it looks like you all had so much fun. I am happy you decided to share this post again on this blog!
LikeLiked by 2 people
It was so fun making everything and then setting it all up 😀 I cannot wait to top this birthday someday LOL. this year we kept it low key and didn’t really do much for his birthday
LikeLiked by 1 person
This is so fun Rossy – you’re so talented. I love the foam letters and the piranha plants and the snack bar place cards and the power up banner – so creative!!! You really went above and beyond, CL is very lucky and thank you so much for sharing your guide – you have created and put together some wonderful items which others can have a go at too if they do a super mario themed party – you are truly awesome! Love ya ❤
LikeLiked by 1 person
aw thanks so much! it definitely took a lot of work to get all this done but it payed off so i’m glad 😀
LikeLike
You are the coolest Mom! I wish I had a mario themed birthday as a child lol
The Bob-Ombs are so CUTE!!! And I love the ghost lanterns. How long did all of this take you to do?
LikeLiked by 1 person
Aw thanks!!! It was so fun! 😀
And everything took me roughly three months to finish, I started early in September because I knew this was excessive haha, but I think putting it all together without those days where I didn’t do anything, maybe a week or two tops?
LikeLike
That’s a long time!! But probably a lot less stressful to space it out instead of doing it all in a few days.
Hopefully you had fun making everything!
LikeLiked by 1 person
I totally did thank you 😀
LikeLiked by 1 person
Love them!! Thank you so much for the crafts and ideas! You are super talented!
LikeLiked by 1 person
These are all great ideas! You guys are very creative ❣️
LikeLiked by 1 person
Thanks so much, I did take some ideas from Pinterest and just recreated them or tweaked them to our liking 🙂
LikeLike
can you say what all the name tags were for the snack bar? I cant see all of the names. they look so cute, by the way! 🙂
LikeLiked by 1 person
Yeah, I’ll link to the post where I wrote everything down. You can see the set up there too for everything 🙂
LikeLike
Probably a long shot but do you have a file for those food place cards?
LikeLike
Unfortunately I do not, I lost them years ago 😦
LikeLike